Did you know you can edit your images after you’ve uploaded them to your WMS library? You don’t have to do everything in an external editor before uploading. Here’s how:
On your site, click on the Libraries tab. Select the image you want to edit (only click once, a double click will open the image). In the toolbar, the Edit Image button on the right hand side will become active. Click on the Edit Image button. The image will open in the image editor.

From here, there are many features you can use to edit your image. There is a zoom tool in the top right and along the bottom there are various menus. You will need to click on them, not just hover over them. The one you will probably find the most useful is the Adjustment menu. Here you can find features such as crop, resize, rotate.
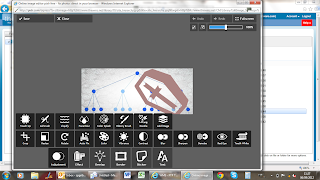
You can also add Effects, Borders and Text to your image. The Overlay allows you to inport another image and place it on top of the image already opened. The secondary image has to be saved on your local machine or cloud drive, rather than in the WMS.
When you’re ready, click the Save button in the top left corner. In the new box, name your image and click save again. Now click Okay. Your image is now saved in your WMS library. Note: when you edit an image the original file is still saved in the WMS library, along with your new file.
As usual, email [email protected] if you have any questions.